
Testing your game
We’ve been testing all the way through this tutorial: make a change, click Preview, try it. That works fine while a game is small. It stops working when the game gets big enough that you can’t reach the interesting part in three commands, or when fixing one thing quietly breaks another.
Quest Viva has two tools for that, and they’re worth learning before your game needs them.
The Debugger
Section titled “The Debugger”Click “Preview” to run the game, then click the Debug button at the top of the player.
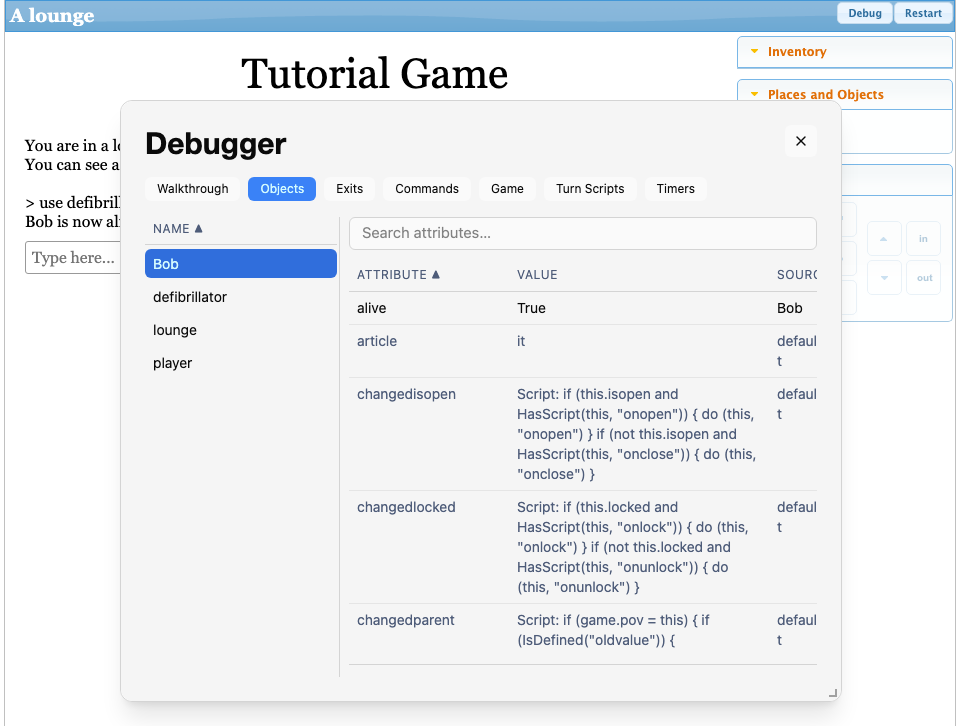
The Debugger shows you what’s actually inside your game while it’s running. The tabs along the top choose what to look at - objects, exits, commands, the game itself, turn scripts and timers - and picking something from the list on the left shows its attributes.
Try it on our game. Select “Bob” and look down his attributes: there’s no alive there at all, because nothing has set it yet. Leave the Debugger open, revive him with the defibrillator, and look again - now alive is there, set to True, with Bob himself in the Source column. This is how you answer the question “did my script actually do anything?”, which is usually the first thing you want to know when something doesn’t work.
It’s also why we used “object has flag” back in More things to do with objects rather than reading Bob.alive directly: for most of the game there is no such attribute to read.
There will be more attributes than you expected. Most objects inherit dozens from the “defaultobject” type, and those are shown in grey, with the Source column saying where each one came from. Type in the search box to narrow the list down.
The Debugger doesn’t stop the game - you can leave it open while you play, and it updates after every turn.
Changing things while the game runs
Section titled “Changing things while the game runs”Click any attribute’s row and a box appears at the bottom with its current value in it. Edit it, click “Apply”, and the change takes effect immediately.
This saves an enormous amount of walking about. To test the ending without solving the game first, select “player”, find parent, and set it to garden. To see Bob’s other description, set his alive to true.
What you type is treated exactly as a script would treat it, so strings need quotes ("a rusty key"), booleans are true or false, numbers are just the number, and an object is its name with no quotes. You can type an expression too, like game.score + 10.
Nothing you change here is saved to your game file - it lasts until the game restarts. Once you’ve found the fix, make it properly in the editor. There’s a Restart button next to Debug for starting again from the beginning without closing the preview.
When something goes wrong
Section titled “When something goes wrong”Sooner or later a script will fail, and the game will print “[Sorry, an error occurred]” followed by a line starting “Error running script:”. Don’t skim past it - the rest of that line says what went wrong, and it’s usually something small:
- Unknown object or variable ‘x’ - nothing called
xexists at that point. Most often a misspelt object or attribute name. Remember they’re case-sensitive:Bob.aliveandbob.aliveare not the same thing. - Too few parameters passed to X function - the call doesn’t match what the function expects.
The message quotes the expression that failed, so switch the script to Code View and search for what it quotes. The script stops at that point, so whatever you expected to happen next didn’t - which is often the symptom you noticed first.
Two things that look like errors aren’t. “I don’t understand your command.” means nothing matched what the player typed at all. “I can’t see that.” means a command did match, but the object the player named isn’t in scope - it’s in another room, shut inside something, or the word they used isn’t one of that object’s names. Something the player can see but can’t get at gets a more specific message of its own, like “The display case is not open.”
Walkthroughs
Section titled “Walkthroughs”A walkthrough is a list of commands that Quest Viva can play back for you. Record the winning route once, and from then on you can replay it whenever you change something, and watch the whole game run past in a couple of seconds.
Select Advanced in the tree and click “+ Add Walkthrough”. Name it “win game”. (From then on there’s a Walkthrough node under Advanced, and its own “⋯” menu offers “Add Walkthrough” for the next one.)
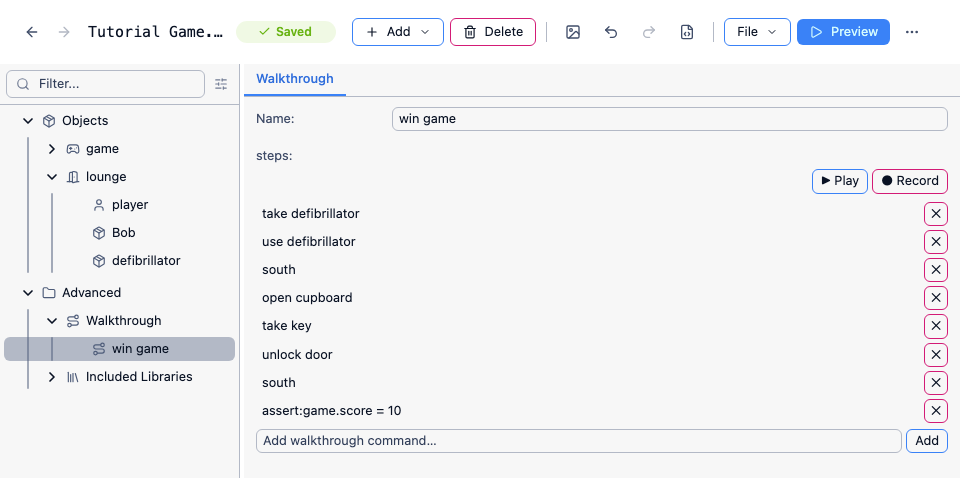
The walkthrough editor is a list of steps, with Play and Record buttons above it. Click Record and play the game normally: take the defibrillator, use it on Bob, go south, open the cupboard, take the key, unlock the door, go south. A banner at the top shows how many steps you’ve recorded. Click its stop button and the steps appear in the editor, where you can edit or reorder them by hand.
Now click Play, and the game runs the whole thing for you. If it still ends in the garden with ten points, your changes haven’t broken the route through the game.
You can also run a walkthrough from inside a running game: open the Debugger and choose the Walkthrough tab.
Checking more than “it finished”
Section titled “Checking more than “it finished””Playing back the steps tells you the game didn’t crash. It doesn’t tell you the game did the right thing - a walkthrough that ends in the garden with three points still reaches the end.
You can check for that with an assertion - a step that starts with assert: followed by something that should be true at that point. Add one as the last step of the walkthrough:
assert:game.score = 10The walkthrough prints the expression and then “Pass” or “Failed”, and stops as soon as one fails. Assert on the things you can’t see in the transcript: a flag you set, the score, where an object ended up.
A second walkthrough is worth having for the ways the player can go wrong - trying the door without the key, using the defibrillator from the kitchen. Those paths break far more often than the winning one, because you test them far less.
Walkthroughs are stripped out when you publish, so players never see them.
Testing that isn’t automatic
Section titled “Testing that isn’t automatic”Neither tool tells you whether your game is any good, or whether a stranger can work out what to do. For that, nothing beats watching somebody else play it without helping them. You’ll learn more in ten minutes of that than in an hour of replaying it yourself, because you already know all the answers.
That’s the building done
Section titled “That’s the building done”There is a great deal more to Quest Viva than this, but you’re best off picking it up as your game needs it. One short chapter left: releasing your game, which also ends with some pointers to what to learn next.
See also
Section titled “See also”- Debugging your game - the Debugger in full
- Using walkthroughs - recording, sub-walkthroughs, answering menus and questions, assertions
- Transcripts - getting a written record of someone else’s play-through
- Troubleshooting - the errors and surprises that come up most often
- Backing up your game - why it’s worth keeping more than one copy as you go