Containers and surfaces
Any object can hold other objects. A container is an object whose children the player can see and reach: a box they can open, a table they can put things on, a backpack that only holds so much. This page is the reference for the Container tab, and for the scripts that let a container decide what it will accept.
| You want | Container type |
|---|---|
| A box, chest or bag the player opens and closes | Container or Closed container |
| A table, shelf or hook - things sit on it, always in view | Surface |
| A bag that only holds so much | Limited container |
| A door or window - it opens and closes but holds nothing | Openable/Closable |
Locks and keys work the same way on a container as on a door, so they’re covered in Doors, locks and keys.
Turning an object into a container
Section titled “Turning an object into a container”Containers are a feature, so they’re hidden until you ask for them. Select the object, go to its Features tab, and tick “Container: object is a container or surface, or can be opened and closed”. A Container tab appears.
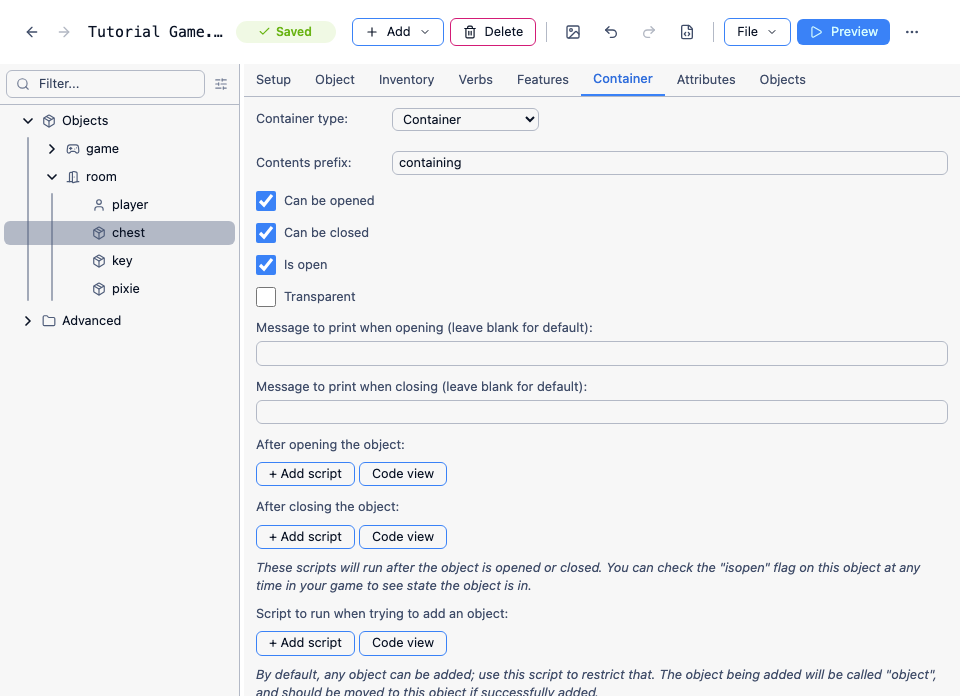
On the Container tab, “Container type” starts at “Not a container”. Change it and the rest of the tab appears.
Container types
Section titled “Container types”Container - the general case. It can be opened and closed, and it starts open.
Closed container - the same, but it starts closed. Objects inside a closed container can’t be seen, referred to or taken until the player opens it.
Surface - things go on it rather than in it. A surface is permanently open and transparent: its contents are listed in the room description before the player has touched it (“a table, on which there is a newspaper”), and it can’t be opened, closed or locked. Tables, shelves, desks and hooks are all surfaces. Most of the tab’s options disappear when you choose it, because they don’t apply.
Limited container - a container that only holds so much. See Limited containers.
Openable/Closable - not a container at all: an object that opens and closes but never holds anything, like a door or a window. See Doors, locks and keys.
The Container tab
Section titled “The Container tab”Contents prefix introduces the contents when the object is listed somewhere with them, in the room description or the inventory. It’s “containing” for a container and “on which there is” for a surface:
You are carrying a machine (with a button).Can be opened and Can be closed control whether OPEN and CLOSE work. Untick both for something that’s permanently open, like the inside of a machine. Is open is the object’s starting state - it’s just the isopen attribute, and it’s what “Closed container” unticks for you.
Transparent lets the player see the contents of a closed container. They’re listed as usual, but the player can’t take them or put anything in until it’s opened.
Hide children until object is looked at keeps the contents completely hidden - not listed, not reachable - until the player examines the object. Looking at it clears the flag for good. It’s useful for a drawer full of clutter that shouldn’t be advertised in the room description.
List children when object is looked at or opened prints the contents as a sentence of their own when the player opens or examines the object, rather than only in parentheses after the object’s name. List prefix sets the wording - the default is “It contains”:
> open fridgeYou open it.It contains some milk and some cheese.Both are in the Advanced section at the bottom of the tab.
Message to print when opening and Message to print when closing replace the default “You open it.” and “You close it.” for this object.
After opening the object and After closing the object are scripts that run once the object has actually been opened or closed. They’re the place for a trap, a smell, or a noise - see Scripts on a container.
Script to run when trying to add an object runs instead of the standard “Done.” when the player puts something in. If you write one, it’s up to you to move the object and tell the player. See A fussy container.
Under Locking, set “Lock type” to “Lockable” and the key settings appear: how many keys (up to five), which objects they are, “Require all keys” if there’s more than one, whether it starts “Locked”, and messages for locking, unlocking and not having the key.
“Automatically unlock if player has the key(s)” and “Automatically open when unlocked” are both on by default, which saves the player steps they’d only resent:
> open boxIt is locked.
> unlock boxYou do not have the key.
> take keyYou pick it up.
> unlock boxUnlocked.You open it.It contains a defibrillator.
OPEN BOX on its own would have done all of that, once the player had the key. Untick the two options if you want each step typed separately. This is the same machinery a lockable door uses, and it’s explained in full in Doors, locks and keys.
A fridge in the kitchen
Section titled “A fridge in the kitchen”A worked example, to put the settings together. The fridge starts closed, and the player should be told what’s inside when they open it.
- Create a “fridge” object in the kitchen with a description like “A big old refrigerator sits in the corner, humming quietly.”
- On the Features tab, tick “Container”. On the Container tab, set “Container type” to “Closed container”.
- In the Advanced section, tick “List children when object is looked at or opened”.
- Add the contents on the fridge’s Objects tab - milk, cheese, beer - or create them anywhere and use “Move to…” in the tree. Give each one a prefix of “some” on its Setup tab, and tick “Object can be taken” on its Inventory tab.
Play it, and the milk isn’t there until the fridge is open - LOOK AT MILK gets “I can’t see that.” Open the fridge and the contents are listed:
> open fridgeYou open it.It contains some milk, some cheese and some beer.“List prefix” changes the “It contains” wording to anything you like: “The cupboard is bare except for”, say.
To make the fridge’s own description change with its state, use the text processor in its “Look at” description:
The fridge is {either fridge.isopen:open, casting its light out into the gloomy kitchen|humming quietly in the corner}.Limited containers
Section titled “Limited containers”A limited container refuses things once it’s full. It needs the game-level feature as well as the object setting: on the game object’s Features tab, tick “Inventory limits”. Until you do, the Container tab shows a note instead of the limit fields.
Quest Viva can limit a container two ways, and applies both:
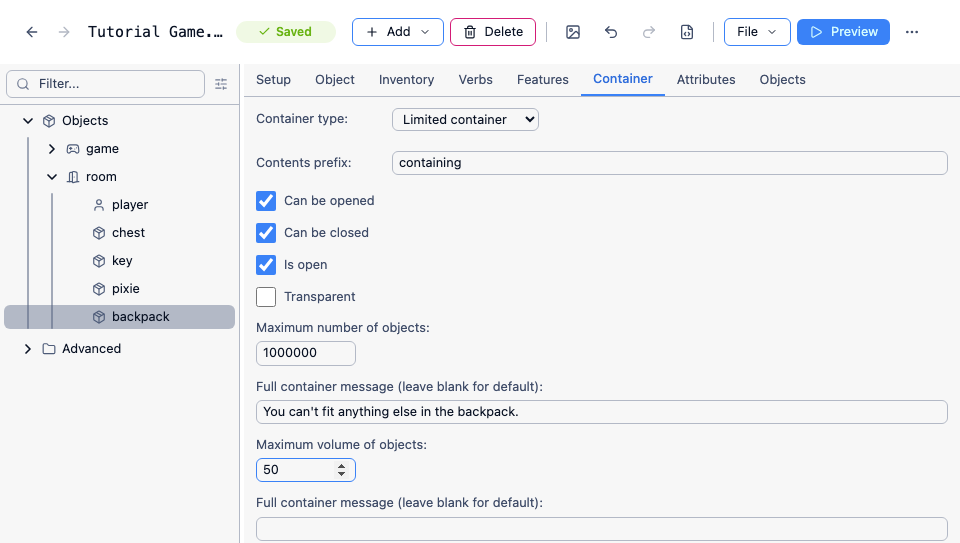
- Maximum number of objects - a simple count.
- Maximum volume of objects - each object’s
volumeattribute is added up, and the new object has to fit in what’s left.
Each has its own “Full container message (leave blank for default)” field, directly under it - the first is used when the count is reached, the second when the volume is.
For a backpack that just holds five things, set “Maximum number of objects” to 5 and ignore volumes. For a volume limit, set “Maximum number of objects” to some large number so the count never bites, set “Maximum volume of objects”, and give every object the player can carry a volume. With “Inventory limits” on, every object’s Inventory tab gains a “Volume” box; objects default to no volume, so anything you forget is weightless.
The units are yours - anything, as long as you’re consistent. A container inside another counts as its own volume plus everything in it, so Quest Viva treats containers as bags that bulge rather than boxes of fixed size.
The player’s own carrying limit is a separate pair of settings on the player object’s Inventory tab - see Taking and dropping objects.
Parts of an object
Section titled “Parts of an object”Sometimes an object has a part the player needs to use: a button on a machine, or a handle on a suitcase. If the object never moves, the part can simply be a scenery object in the same room. If the player can carry the object around, put the part inside it, and make the object a container that the player can reach into but not put anything in:
- Add the button on the machine’s Objects tab, or move an existing button to “machine” with “Move to…” in the tree.
- On the button’s Setup tab, tick “Scenery (do not display in room description)”. Leave “Object can be taken” unticked on its Inventory tab.
- On the machine’s Features tab, tick “Container: object is a container or surface, or can be opened and closed”. On the Container tab, set the type to “Container”, untick “Can be opened” and “Can be closed”, and leave “Is open” ticked.
- Set “Contents prefix” to “with”.
- Set “Script to run when trying to add an object” to print a refusal:
msg ("You can't put anything in the machine.")Mention the button in the machine’s description, since Quest Viva won’t list it. The player can now PUSH BUTTON whether the machine is on the floor or in their hands. TAKE BUTTON gets “You can’t take it.”, OPEN and CLOSE MACHINE get “You can’t open it.” and “You can’t close it.”, and PUT anything IN or ON the machine gets your message. The button stays out of room descriptions and TAKE ALL. While the player is carrying the machine, the button does show under it in the Inventory pane, and INVENTORY says “a machine (with a button)” - which is why the contents prefix is worth changing.
Don’t use a surface for this. When the player carries it, a surface lists its scenery children (“a machine (on which there is a button)”), and it lets the player put things on the machine.
What actually lets the player reach the button is the machine’s isopen attribute: the children of any object whose isopen is true are within reach. So an object that isn’t a container at all works too, if you give it an isopen attribute set to true on the Attributes tab. PUT then gets the standard “You can’t do that.”, with no script needed.
Scripts on a container
Section titled “Scripts on a container”A trapped chest
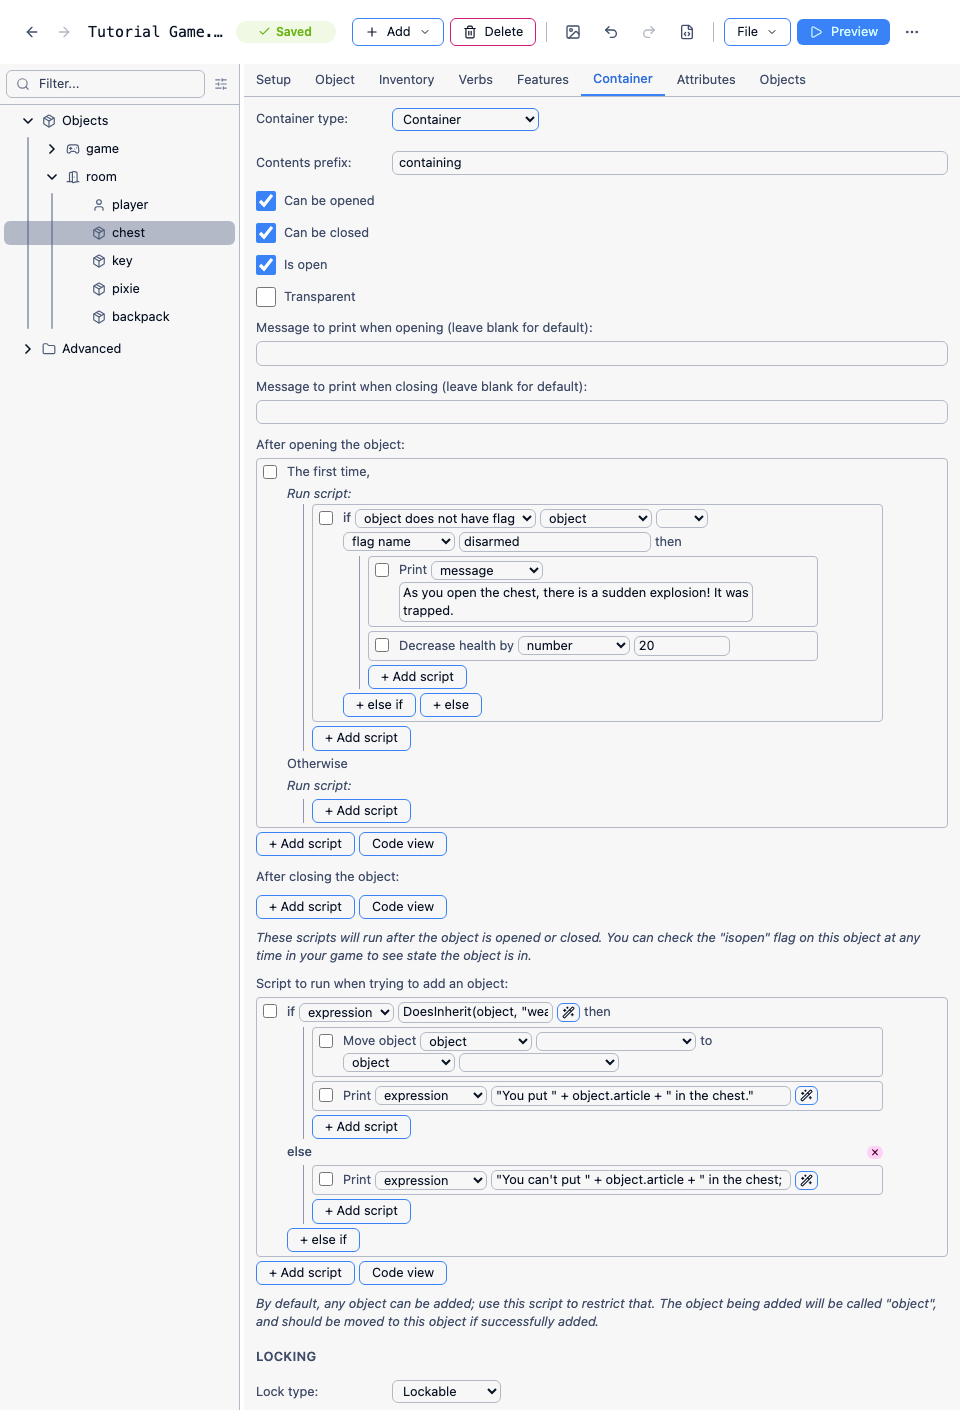
Section titled “A trapped chest”“After opening the object” runs once the chest is open. Here the trap fires only the first time, and only if the player hasn’t disarmed it:
firsttime { if (not GetBoolean(this, "disarmed")) { msg ("As you open the chest, there is a sudden explosion! It was trapped.") DecreaseHealth (20) }}this is the object the script is attached to. DecreaseHealth needs the “Health” game feature turned on.
A fussy container
Section titled “A fussy container”“Script to run when trying to add an object” gets the object being added in a variable called object. Whatever you do with it, the script is now in charge: it has to move the object and print a message, or refuse. This chest only takes clothing:
if (DoesInherit(object, "wearable")) { MoveObject (object, this) msg ("You put " + object.article + " in the chest.")}else { msg ("You can't put " + object.article + " in the chest; it only likes clothing!")}object.article gives “it” or, for something set up as a plural on its Setup tab, “them” - so a pair of trousers reads correctly without you writing two messages.
If all you want is a nicer message than “Done.”, the script only needs the MoveObject and msg lines, with no test around them.
Both of these scripts, in the visual editor:
Counting what goes in
Section titled “Counting what goes in”The same script can react to how full the container is. This one finishes the game once the chest holds three things:
MoveObject (object, this)msg ("You put " + object.article + " in the chest.")if (ListCount(GetAllChildObjects(this)) > 2) { msg ("Congratulations, you filled the chest, and completed your quest.") finish}GetAllChildObjects counts what’s nested inside too, so a player who puts three coins in a bag and then the bag in the chest still triggers it. Testing for “more than two” rather than “exactly three” is the habit to get into: the player can always arrive at a number you didn’t expect.
See also
Section titled “See also”- Doors, locks and keys - locking a container, keys, and openable objects
- Taking and dropping objects - the Inventory tab and the player’s own carrying limit
- Objects and rooms - the Objects tab, and what “children” means