
Exits
An exit is the link between two rooms. It has a direction, a destination, and a handful of settings that decide whether the player can see it, whether they can use it, and what happens when they do.
| You want | Use |
|---|---|
| A normal way from one room to another | The room’s Exits tab |
| A bit of description when the player goes that way | “Print message when used” |
| To decide at the time whether the player may pass | “Run a script” |
| A way that opens up later in the game | An invisible exit you make visible |
| A way called “kitchen” rather than “north” | A non-directional exit |
| A lock, a key or a door | Doors, locks and keys |
Creating an exit
Section titled “Creating an exit”Select the room and go to its Exits tab. The compass grid shows the twelve directions: eight points of the compass, plus up, down, in and out. Click an empty direction and a small panel appears headed “Create exit: north”. Choose the destination room, leave “Also create the return exit” ticked if you want a way back as well, and click “Create exit”.
The destination list holds every room in the game except this one. If the destination already has an exit in the opposite direction, Quest Viva creates this one and warns you rather than overwriting the existing exit.
Below the grid, “+ Add Exit” creates an exit with no direction at all - see Non-directional exits - and the list underneath shows every exit the room has. Use the arrows to change the order they’re listed in, the pencil to edit one, and × to delete it. Deleting an exit that has a matching return exit offers to delete both.
Like everything else in Quest Viva, an exit is an object, and it appears in the tree under the room.
The room’s Exits tab also has an “Exits list prefix” field, in the Advanced section at the bottom. It replaces “You can go” for this room only:
Ways out lead through an arched doorway to the south, to the kitchen or east.
The Exit tab
Section titled “The Exit tab”Selecting an exit in the tree, or clicking the pencil beside it, opens its own Exit tab.
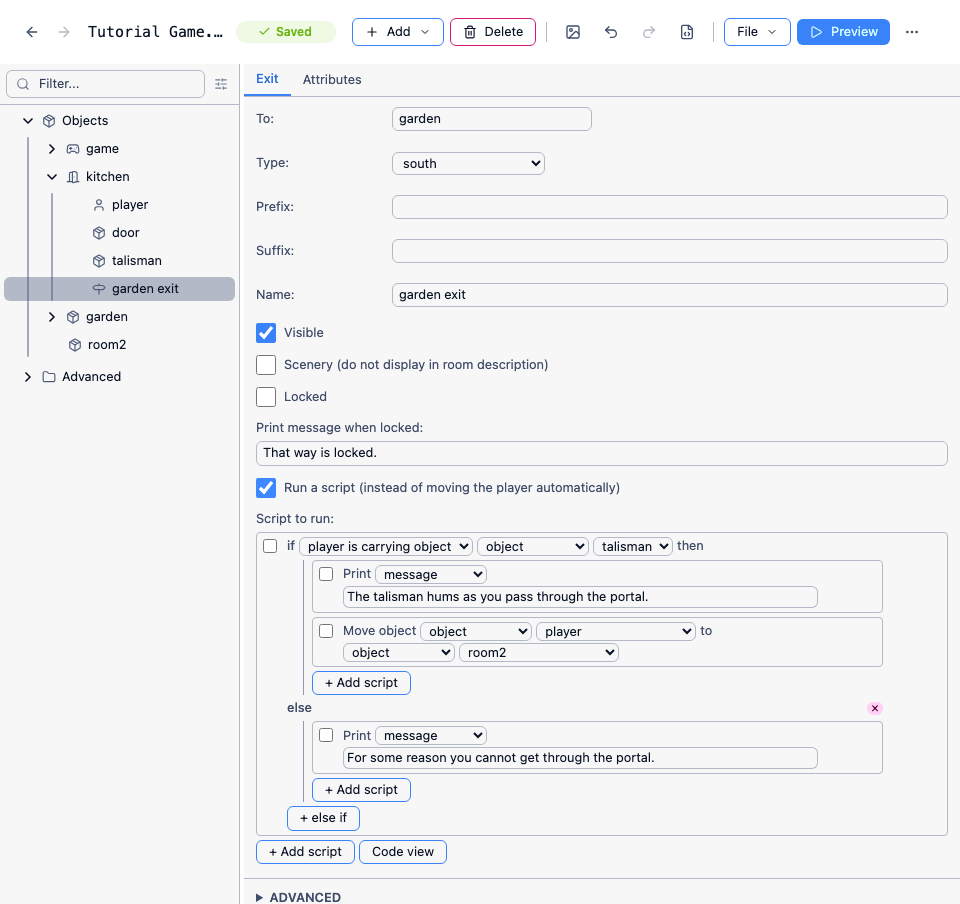
Where the exit leads. The dropdown lists every room in the game, including the room the exit is in - handy for a maze, or a corridor that loops back on itself.
Type and alias
Section titled “Type and alias”The type is the direction the exit was created in. It sets the exit’s alias, and gives the exit its short form: an exit of type “north” can also be used by typing N.
The alias is what the player sees and types, and it is what decides which compass button the exit lights up. It’s in the Advanced section at the bottom of the tab, because most of the time it’s simply the direction you picked.
If you change the alias and leave the type alone, both work. An exit with the alias “east” and the type “north” appears as “east” in the room description, lights the east button on the compass, and answers to EAST, E and N. That is occasionally useful, but as a rule set the type to the direction you want and leave the alias to follow it.
Prefix and suffix
Section titled “Prefix and suffix”Text added around the direction in the room’s list of exits. A south exit with the prefix “through an arched doorway to the” gives:
You can go through an arched doorway to the south.
The suffix goes after it, in the same way. When hyperlinks are on, only the direction itself is a link - the prefix and suffix are plain text.
Exits don’t need a name. Quest Viva gives unnamed ones an internal one when the game starts. But a script can only refer to an exit that has a name, so if you want to unlock it, reveal it or change its destination during the game, type a name such as “garden exit” here. The editor reminds you with a note above the box when you tick “Locked” or untick “Visible” on an exit that hasn’t got one.
Visible, Scenery and Locked
Section titled “Visible, Scenery and Locked”These three control what the player can see and do, and they are easy to confuse:
| Setting | In the room description | On the compass | Can the player use it? |
|---|---|---|---|
| Normal | Listed | Lit | Yes |
| Visible unticked | No | No | No |
| Scenery ticked | No | No | Yes |
| Locked ticked | Listed | Lit | No - shows the locked message |
An exit that is not visible doesn’t exist as far as the player is concerned. That makes it the easiest way to open up a route later in the game - see An exit that appears later.
Scenery is for an exit you don’t want listed but do want to work. If a flight of stairs leads up and to the east, create both exits so that UP and EAST both work, and mark one as scenery so the player isn’t told about two separate ways out.
Print message when locked
Section titled “Print message when locked”What the player sees instead of moving when the exit is locked. Leave it empty and they get “That way is locked.” Locked exits, keys and doors are covered in Doors, locks and keys.
Print message when used
Section titled “Print message when used”By default going through an exit prints nothing, and the player just sees the new room. Put text here and it’s printed first:
> downYou scramble down the ladder.
You are in a cellar.
This field is hidden when “Run a script” is ticked, because a script does the moving itself.
Run a script
Section titled “Run a script”Tick “Run a script (instead of moving the player automatically)” and a script box appears. Nothing else happens when the exit is used - if you want the player to move, your script has to do it.
Look directions
Section titled “Look directions”In the Advanced section at the bottom of the tab. Tick “Exit is a look direction only (players can’t move this way)” and the exit stops being a way out altogether: it isn’t listed, isn’t on the compass, and NORTHEAST gets “You can’t go there.” All that’s left is the “Look” box, which is what LOOK NORTHEAST prints:
Rolling hills stretch away to the northeast.
Use it for the view from a clifftop, or a corridor the player can see down but not reach. “Create a look exit instead” on the Exits tab makes one directly.
You can also fill in “Look” on an ordinary exit, and LOOK EAST will print it instead of the default “You are looking east.” If the exit is locked, the locked message is added after it.
The Map and Options tabs
Section titled “The Map and Options tabs”The Map tab only appears when the grid map is turned on, and sets how this exit is drawn: “Length” is how many squares long the corridor is, and “Offset X” and “Offset Y” nudge the destination room on the grid. See Showing a map.
The Options tab only appears when the light/dark feature is on, and lets an exit be a light source - which is how you write “it’s pitch dark, but there’s light coming from the doorway”. See Handling light and dark.
An exit that appears later
Section titled “An exit that appears later”Rather than creating an exit during the game, create it in the editor and untick “Visible”. Give it a name, then make it visible when the moment comes:
hall to attic.visible = truemsg ("A trapdoor opens in the ceiling.")From then on it’s listed, it’s on the compass, and the player can use it.
A one-way exit
Section titled “A one-way exit”Untick “Also create the return exit” when you create it, or delete the one that was made for you. Nothing stops the player coming back except the absence of an exit.
A script that decides whether the player can pass
Section titled “A script that decides whether the player can pass”Tick “Run a script” and test whatever the condition is. Print the message first, then move the player, because moving them prints the room description:
if (Got(talisman)) { msg ("The talisman hums as you pass through the portal.") MoveObject (game.pov, this.to)}else { msg ("For some reason you cannot get through the portal.")}this is the exit the script is attached to, and this.to is its destination, so the same script works on any exit, and keeps working if you change where the exit leads.
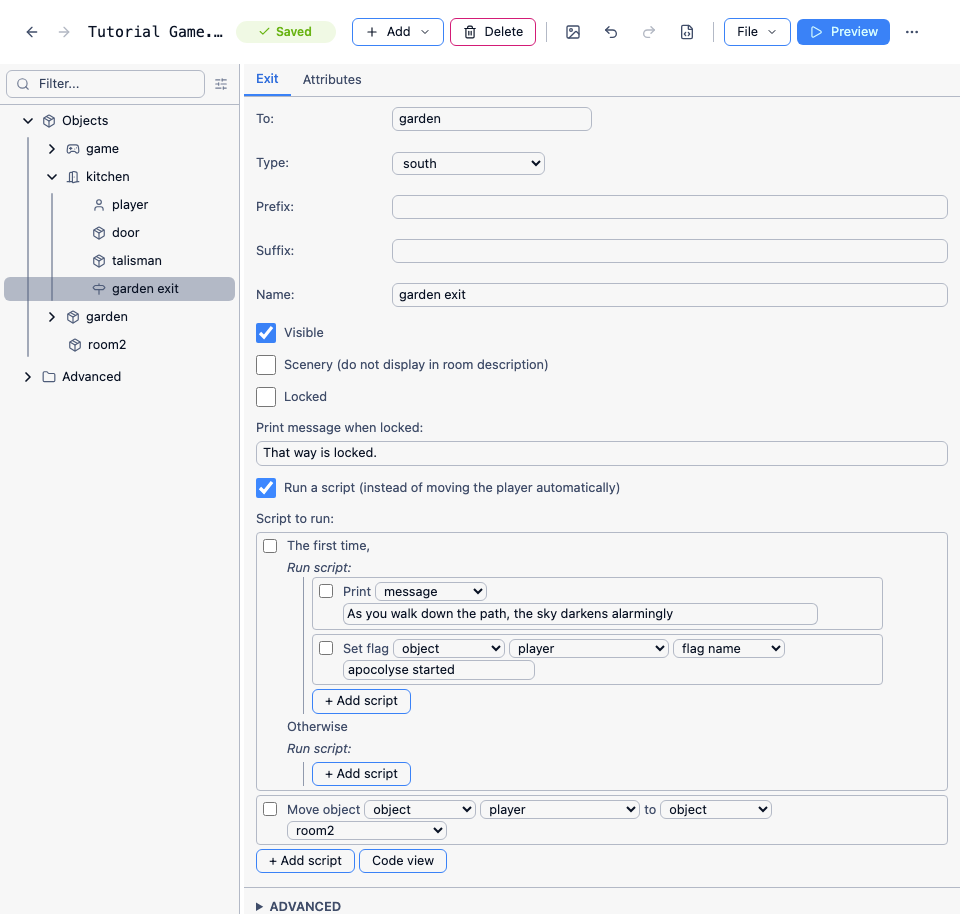
To make something happen the first time the player goes that way, wrap it in firsttime and move them at the end:
firsttime { msg ("As you walk down the path, the sky darkens alarmingly.")}MoveObject (game.pov, this.to)A script is the right tool for an ongoing condition - carrying something, having talked to someone. For a one-off state change, like a door that gets unlocked and stays unlocked, use the locked attribute instead.
Non-directional exits
Section titled “Non-directional exits”An exit doesn’t have to be a compass direction. Use “+ Add Exit” on the room’s Exits tab. The new exit has no direction and nowhere to go, so open it, set “To”, and set the alias in the Advanced section to whatever you want - “kitchen”, “the old mill”, “down the rabbit hole”. (An exit created in a compass direction can be turned into one of these by setting “Type” to “Non-directional exit” and changing the alias.)
The player can’t type KITCHEN on its own, because Quest Viva only recognises the twelve compass words as bare commands. They type GO KITCHEN or GO TO KITCHEN, or click it: a non-directional exit appears in the Places and Objects pane rather than on the compass. A prefix of “to the” makes the room description read naturally:
You can go to the kitchen.
Changing exits from a script
Section titled “Changing exits from a script”Everything on the tab is an attribute, and a named exit’s attributes can be changed at any time:
// lock and unlockhall to tower.locked = truehall to tower.locked = false
// reveal ithall to attic.visible = true
// send it somewhere elsehall to kitchen.to = garden
LockExit and UnlockExit do the same as setting locked, and are what the editor adds from the Objects category.
Creating and finding exits from a script
Section titled “Creating and finding exits from a script”When an exit can’t be prepared in advance - a randomly generated maze, say - use the create exit script command. Its first argument is the direction the player types, and its fourth is the direction type:
create exit ("up", hall, attic, "updirection")CreateBiExits makes a pair at once, working out the return direction for you:
CreateBiExits ("down", hall, cellar)To find an existing exit, GetExitByName takes a room and a direction, and GetExitByLink takes two rooms. Both return the exit’s name, or null:
exitname = GetExitByName(hall, "east")if (not exitname = null) { ext = GetObject(exitname) msg ("The exit east goes to " + ext.to.name + ".")}To work with all of a room’s exits, ScopeExits gives the visible exits of the room the player is in, ScopeExitsForRoom does the same for any room, and ScopeUnlockedExitsForRoom leaves out the locked ones. PickOneExit and PickOneUnlockedExit pick one at random, which is all you need for an NPC that wanders.
See also
Section titled “See also”- Doors, locks and keys - locked exits, keys, doors that open and close, and stopping the player leaving
- Objects and rooms - the Setup, Room and Objects tabs
- Showing a map - the grid map and the Map tab