
Using and creating libraries
A library is a file of Quest Viva elements - object types, functions, verbs, commands, even objects - that your game includes. Libraries are how Quest Viva itself works: Core.aslx is a library, included by default in every game. It handles most of what a text adventure does - working out what the player can see, handling commands, implementing containers, and much more. That means Quest Viva’s built-in behaviour is extensible, and replaceable.
You might use a library because you want to reuse your own work across several games, because someone else has already written the feature you need, or because a big game is easier to manage in pieces.
Seeing what the built-in libraries add
Section titled “Seeing what the built-in libraries add”Click the tree view options button above the tree (next to the “Filter…” box), and select “Show Library Elements”. A lot more appears in the tree. Everything in grey has come from a library, and if you click on it, a banner across the top tells you which one. Core.aslx adds most of the functions, and all the types, commands and verbs; English.aslx adds the templates. Some of the more fundamental functions, and all the script commands, are built into the engine rather than defined in a library, so they don’t appear here.
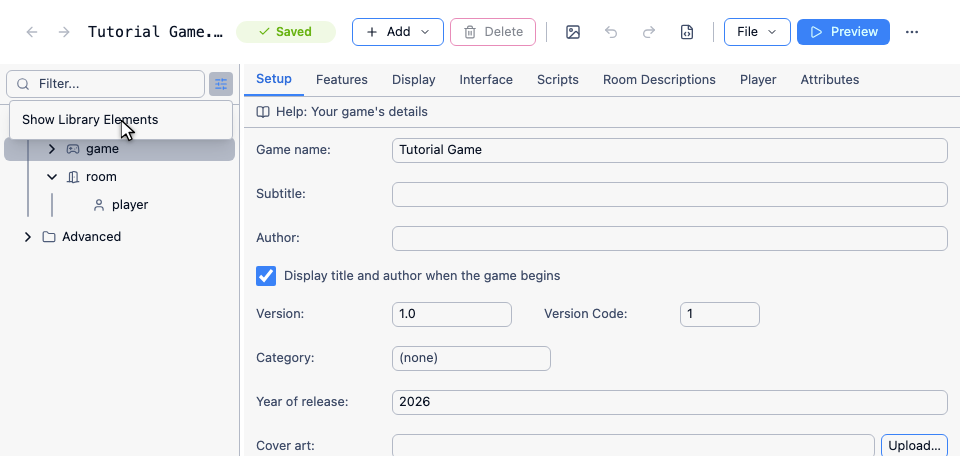
To change something from a built-in library, copy it into your own game - see Overriding functions.
How to add a library to your game
Section titled “How to add a library to your game”Click Advanced at the bottom of the tree, then click Add Library. (Once your game has a library, Included Libraries also appears under Advanced, and its “⋯” button has Add Library too.) Choose the library file (.aslx or .xml). Quest Viva stores a copy of the file with your game, and adds a line of code to your game so the library is part of it. A banner then asks you to reload the editor - click Reload so the library’s contents are loaded into the editor session.
Editing a library
Section titled “Editing a library”Click an included library in the tree to see its contents. If it’s one of your own libraries, you can edit it right there. When you click away, your change is checked first: if the XML isn’t valid, the edit is refused and the file keeps its last working version, so a mistake can’t leave your game unable to load. A library is read when the game loads, so after a successful edit a banner asks you to reload the editor to apply it.
You can also edit a library in the raw XML code view: choose the library from the file list at the top instead of your game file, make your changes, then click Apply.
The built-in libraries that ship with Quest Viva, such as Core.aslx and English.aslx, are shown read-only, because they aren’t part of your game file.
Where to find libraries
Section titled “Where to find libraries”- The Pixie’s Quest wiki - a set of substantial libraries, each with its own tutorial: combat and magic for an RPG, dynamic conversations and consultables, better pronoun handling, and more. They were written for Quest 5, so test anything you add.
- The Libraries and Code Samples forum - the old textadventures.co.uk forum, now a read-only archive. You can’t post, but years of libraries and worked examples are still there to read and download.
Conflicts and the order of libraries
Section titled “Conflicts and the order of libraries”If several things in your game have the same name, later ones overwrite earlier ones. That’s what lets a library change the fundamentals of Quest Viva.
So your own libraries should come after the standard libraries, and if you have several of them, the order can matter.
Templates are the exception (dynamic templates are not), but unless you are adding a new language file, templates are best avoided - see Translating Quest Viva if you are.
Creating a library
Section titled “Creating a library”Library files are just text files, so you can start one in any text editor. Once you have added it to your game, you can carry on editing it in Quest Viva (see Editing a library). Like a game file, a library is XML, so a little understanding of XML is useful.
The root element is library, so the first line of the file is:
<library>and the last line is:
</library>Everything in between is XML elements, just as in the main game. A library can define objects, functions, types - anything a game file can define.
The easiest way to write those elements is to create them in the editor and then move them across. For a new function, create the function in the editor, check it works, then open the raw XML code view, cut the relevant code, and paste it into your library. Test again.
The only tricky part is getting the whole element. A function starts with
<function...and ends with
</function>and you need whole lines. In the raw XML code view, and in most code editors, there are fold markers down the left-hand side; click one and the element collapses to a single line, which you can then copy with no risk of missing part of it.
A good split is to move turn scripts, functions, verbs, commands and types into libraries, and leave objects - rooms and items - in the main game, where the editor handles them much better. You don’t need to plan for libraries from the start; there isn’t much point until your game has a fair number of functions.
If you create a library, consider adding editor tabs and script commands to it, so that whoever uses it - even if that’s only you - can use its features without writing code. See Adding editor tabs and script commands.
If you make your library publicly available, make sure all its elements have names, so users can override them. Verb and command elements are the ones most often left unnamed.
File name and location
Section titled “File name and location”Library files usually end .aslx, like games, but you can use .xml instead.
If you keep your libraries in one folder and your games in another, that’s fine, as long as the include in your game file has the right path:
<include ref="../lib/Conversation.xml" />When you publish your game, everything from every library you use - including Core.aslx - is written into the .quest file, whatever folder it came from. You don’t have to do anything to make that happen, and it means a later update to Core.aslx can’t break a game you’ve already published.
Sharing a library
Section titled “Sharing a library”If you’ve built something in your game that others could use, it’s worth turning it into a library, with a short demo game to show what it does. Writing the demo makes you think about the other ways the library might be used, and people who try it will find problems you didn’t - so you end up with something more robust. It’s also a diagnostic: months later, when your game mysteriously won’t load, try loading the demo. If it loads, the library is fine and the problem is elsewhere.
Organising a large game
Section titled “Organising a large game”Breaking a big game across several libraries makes things easier to find. Group them systematically - commands in one, functions in another, or one library per part of the game - and use a code editor that can search a whole folder.
Libraries can include other libraries, just as the main game does.
Only put objects in a library if you’re sure they won’t change: they’re far easier to edit in the editor.
Arrange your libraries so that the ones higher in the list don’t use verbs, types, dynamic templates or functions from the ones lower down. Quest Viva doesn’t care - as long as a function exists somewhere, it’s happy - but sooner or later something will go wrong and your game won’t load, with no clue where the error is. When that happens, create a new test game in the same folder and add your libraries one at a time, in order. The one that refuses to load contains the error, and that only works if the higher libraries don’t depend on the lower ones.
With that in mind, a reasonable default order is: verbs and dynamic templates first (below the built-in libraries), then general functions, then types, then the functions specific to your game, then commands. Every game is different, so treat that as a starting point rather than a rule.