
Showing a map
Many players map a text adventure with pencil and paper as they go. Quest Viva can draw that map for them: each room appears on a grid the first time the player reaches it, with a dot showing where they are. This page shows you how to turn the map on, tune how each room and exit is drawn, and deal with the cases the automatic map can’t work out by itself - levels, teleporting and clicks.
To turn the map on, select “game” in the tree, go to the Interface tab, and tick “Map and Drawing Grid”. More settings appear underneath:
- Scale - the width and height of one grid square, in pixels (30 by default).
- Height (pixels) - the height of the map panel (300 by default).
- Exit width and Exit colour - how the lines between rooms are drawn.
- Map should respond to clicks? - see Handling player clicks.
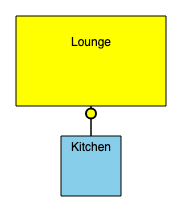
Run your game and move between rooms. When the player first enters a room, it’s drawn on the map, and the yellow dot shows where they are. This is what it looks like for the tutorial game:

Quest Viva works out where each room goes from its exits: a room to the north of the lounge is drawn above it, and so on. You don’t place rooms by hand.
By default, each room is drawn as a 1x1 square. To change that, select the room and go to its Map tab (it only appears once the map is turned on). There you can set the room’s Width and Length in grid squares, its Fill colour, Border colour, Border width and Border type, and a Label with its own Label colour. Here’s the tutorial game with a 5x3 yellow lounge and a 2x2 sky blue kitchen, with labels added:
Each exit is drawn as a line one grid square long. To change that, select the exit in the tree and go to its Map tab, where you can set its Length. A length of 0 draws the two rooms right next to each other with no line - which also means the player can’t see there’s an exit there.
If you change the length of an exit, change the exit coming back the other way to match. Otherwise the rooms end up in different places depending on which way the player walked.
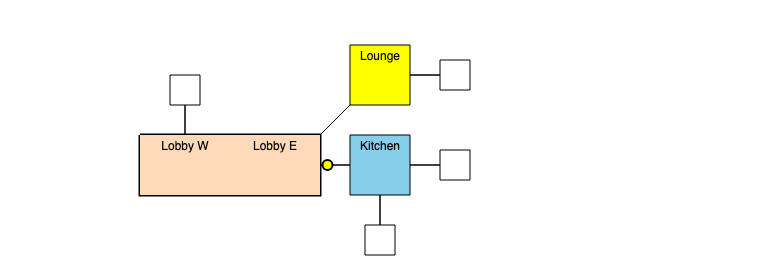
A very large room can be split into more than one location. Say the lobby is huge, and the player can be at its east end or its west end. Set the Border type of the east end to “Path West” and of the west end to “Path East”, so the side where the two halves meet has no border, and give the exits between them a length of 0 in both directions. In the illustration below, the border width of both rooms is 3 to show the effect more clearly:
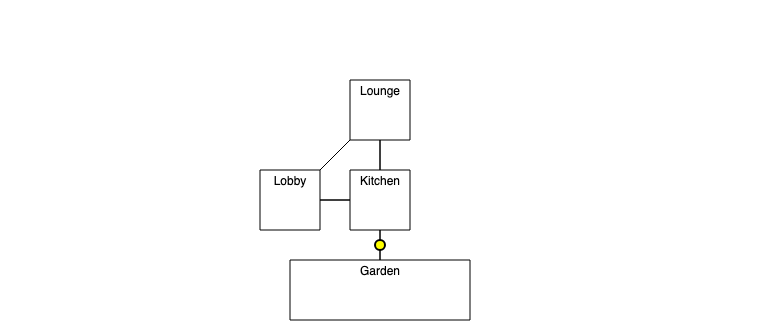
If rooms connect in a loop, the distance has to be the same whichever way round the player goes. If it isn’t, the player’s dot is drawn a little further out of place each time they go round. This is especially tricky with diagonal exits, so in a loop it’s best either to avoid diagonals or to make every room in the loop the same size square.
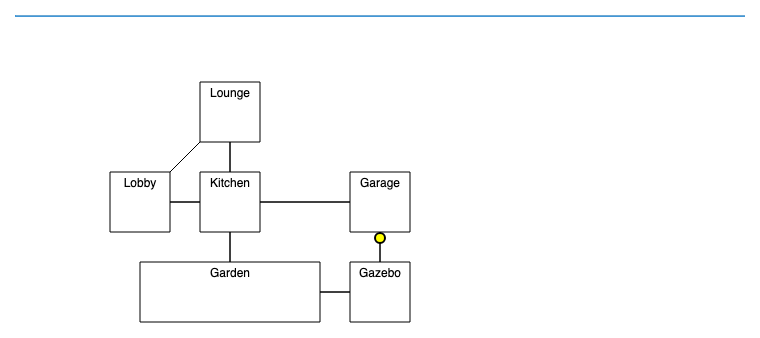
In this example, the three rooms in the loop are all 2x2 squares, so the diagonal works:
Here another loop has been added, but the distances don’t match, so the exits don’t meet:
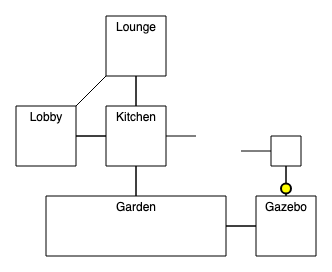
To fix it, make the distances match horizontally, then do the same vertically. The dot sits in the middle of each room, so the distance between two rooms is half the width of each plus the length of the exit between them. Along the bottom of the loop, the garden is 6 wide and the gazebo 2 wide, so the distance is 3 + 1 + 1 = 5. Along the top, the kitchen is 2 wide and the garage 1 wide, which gives halves of 1 and 0.5. The map can’t use fractions, so make the garage 2 wide too; the halves now add up to 2, so the exit between kitchen and garage needs a length of 3 (in both directions) to make 5.
Once the vertical distances match as well, the loop closes:
Up and down, in and out
Section titled “Up and down, in and out”The map copes with up and down exits, though it doesn’t draw a line for them. When the player goes up or down, the rooms on other levels are shown faded behind the current level. This assumes your game is strictly levelled - the only way between levels is by up and down exits. If you have a staircase that goes north, see Vertical movement.
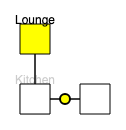
You can only go seven levels up from the starting room, and seven levels down.
In and out exits put the other room on top of the current one, centred on it.
Sometimes two exits lead to the same place: a shed to the east might be reached by going east or by going in. The map uses whichever exit comes last in the room’s list of exits, so put the in exit above the east exit. In the shed, likewise, put the out exit above the west exit.
Planning your map with Trizbort
Section titled “Planning your map with Trizbort”Trizbort is a free, browser-based tool for drawing text adventure maps. You can lay out rooms, exits and the objects in each room there, then export the design as a Quest game to carry on with in Quest Viva. It’s a one-way trip: once you start changing the game in Quest Viva, you can’t take those changes back to Trizbort. Only the rooms, exits and objects carry over, not Trizbort’s layout - the Quest Viva map is still worked out from the exits, as described above.
Advanced options
Section titled “Advanced options”The rest of this page uses code. You don’t need to understand it to use it - you can paste it into the script editor’s code view.
The map works by keeping a dictionary attribute, grid_coordinates, on the player object. Each time the player moves, it’s updated with the positions of the new room and the rooms its exits lead to. If you get an error about a dictionary key in a game with a map, the map is the likely cause.
Changing the colour of the map
Section titled “Changing the colour of the map”This makes the map’s background red:
JS.setCss ("#gridPanel", "background-color:red")Put it in the “User interface initialisation script” on the game’s Advanced Scripts tab, so it runs both at the start and when the player loads a saved game. If you can’t see that tab, tick “Show advanced scripts for the game object” on the game’s Features tab.
Turning the grid on and off
Section titled “Turning the grid on and off”To show and hide the map during the game, turn it on in the editor as above, so it’s set up at the start, and then use JS.ShowGrid. It takes the height of the map in pixels; 0 hides it. This hides the map:
JS.ShowGrid (0)And this shows it again at the default height:
JS.ShowGrid (300)Vertical movement
Section titled “Vertical movement”A staircase might lead north from the hall to the landing, but you want the landing drawn on the level above. The map only changes level for up and down exits, so you have to set the level yourself. Each room’s level is its z coordinate, which you can read with Grid_GetGridCoordinateForPlayer and change with Grid_SetGridCoordinateForPlayer.
In each of the two rooms, set the other room’s level relative to this one. Select the room, and on its Scripts tab add this to “After entering the room”. For hall:
Grid_SetGridCoordinateForPlayer (game.pov, landing, "z", Grid_GetGridCoordinateForPlayer(game.pov, hall, "z") + 1)And for landing:
Grid_SetGridCoordinateForPlayer (game.pov, hall, "z", Grid_GetGridCoordinateForPlayer(game.pov, landing, "z") - 1)It has to be this way round. When the player enters a room, the map positions the neighbouring rooms, putting them on the same level, and only then runs the room’s scripts - so each room corrects its neighbour’s level before the player walks there. A room that tries to set its own level is too late, and drifts up or down a level with each trip.
Teleporting
Section titled “Teleporting”Teleporting here means moving the player to a room that isn’t connected to where they are - they’ve flown to another planet, been dragged off to prison, or cast a spell. If you move the player to a room the map hasn’t reached yet, it doesn’t know where to draw it, and the player sees a string of errors.
There are several ways round this, each suited to a different kind of game.
Limited teleportation
Section titled “Limited teleportation”Restriction: Can only move the player to a room the map already knows about.
The simplest answer is to only let the player teleport to rooms they’ve already visited, as many games do with fast travel. The Fast travel page shows how to offer a menu of visited rooms.
Mapping everywhere
Section titled “Mapping everywhere”Restriction: Only maps rooms that can be reached from the start by exits.
Alternatively, work out where every room goes at the start of the game. Create a function called VisitRoom with one parameter, room, and paste in this code:
if (not GetBoolean(room, "genvisited")) { room.genvisited = true Grid_CalculateMapCoordinates (room, game.pov) // Grid_DrawRoom (room, false, game.pov) foreach (exit, AllExits()) { if (exit.parent = room) { VisitRoom (exit.to) } }}Then call it from the game’s start script:
VisitRoom (game.pov.parent)Now you can move the player to any room reachable from the start. The fourth line is commented out; remove the // and the whole map is drawn from the start, rather than being revealed as the player explores.
Reset the map
Section titled “Reset the map”Restriction: Best for separate regions the player can’t come back to.
Another approach is to throw the map away and start again from the new room. This moves the player to room with a fresh map:
game.pov.grid_coordinates = nullMoveObject (game.pov, room)JS.Grid_ClearAllLayers ()Grid_RedrawGrid_DrawPlayerInRoom (game.pov.parent)The player loses the old map, and if they can teleport back, they start mapping it again from scratch.
Save the map
Section titled “Save the map”Restriction: Only for separate regions.
Instead of throwing the map away, you can save it in an attribute and bring it back later. Say your game has three regions with no way to walk between them: when the player teleports from the first region to the second, save the first region’s map and load the second’s. The hard part is knowing which region the player is leaving - which is much easier if each region has only one place to teleport from.
Save the map, single departure
Section titled “Save the map, single departure”Restriction: Only for separate regions, each with a single room the player can teleport to and from.
With a single departure point in each region, the room itself identifies the region. Suppose a railway with a station in each region, called station one, station two and so on. Create a function called TeleportTo with one parameter, to, and paste in this code:
from = game.pov.parentset (game.pov, "saved_map_for_" + from.name, game.pov.grid_coordinates)if (HasAttribute(game.pov, "saved_map_for_" + to.name)) { game.pov.grid_coordinates = GetAttribute(game.pov, "saved_map_for_" + to.name)}else { game.pov.grid_coordinates = null}MoveObject (game.pov, to)JS.Grid_ClearAllLayers ()Grid_RedrawGrid_DrawPlayerInRoom (game.pov.parent)Then, in the command or script that takes the train from station one:
TeleportTo (station two)Going back works the same way, with TeleportTo (station one). Each time the player arrives, they see the map of that region as they left it.
Handling player clicks
Section titled “Handling player clicks”To make the map respond when the player clicks it, tick “Map should respond to clicks?” on the game’s Interface tab, then override the GridSquareClick function (see Overriding functions): in the tree options, turn on “Show Library Elements”, select GridSquareClick, and click “Copy into your game”. It’s given the x and y of the grid square that was clicked.
Paste this into your copy of the function. It finds the room the player clicked on, if any, among the rooms already drawn on the current level:
z = Grid_GetGridCoordinateForPlayer(game.pov, game.pov.parent, "z")foreach (room, AllObjects()) { if (Grid_GetRoomBooleanForPlayer(game.pov, room, "grid_isdrawn")) { left = Grid_GetGridCoordinateForPlayer(game.pov, room, "x") top = Grid_GetGridCoordinateForPlayer(game.pov, room, "y") if (Grid_GetGridCoordinateForPlayer(game.pov, room, "z") = z) { if (x < left + room.grid_width and x + 1 > left and y < top + room.grid_length and y + 1 > top) { msg ("You clicked on " + GetDisplayName(room) + ".") } } }}Play the game and click a room on the map, and its name is printed. To make it do something useful, change the msg line. For example, to let the player travel to any room on the map just by clicking it:
if (room <> game.pov.parent) { MoveObject (game.pov, room)}Because the player can only click rooms that are already on the map, this is safe to use with teleporting.